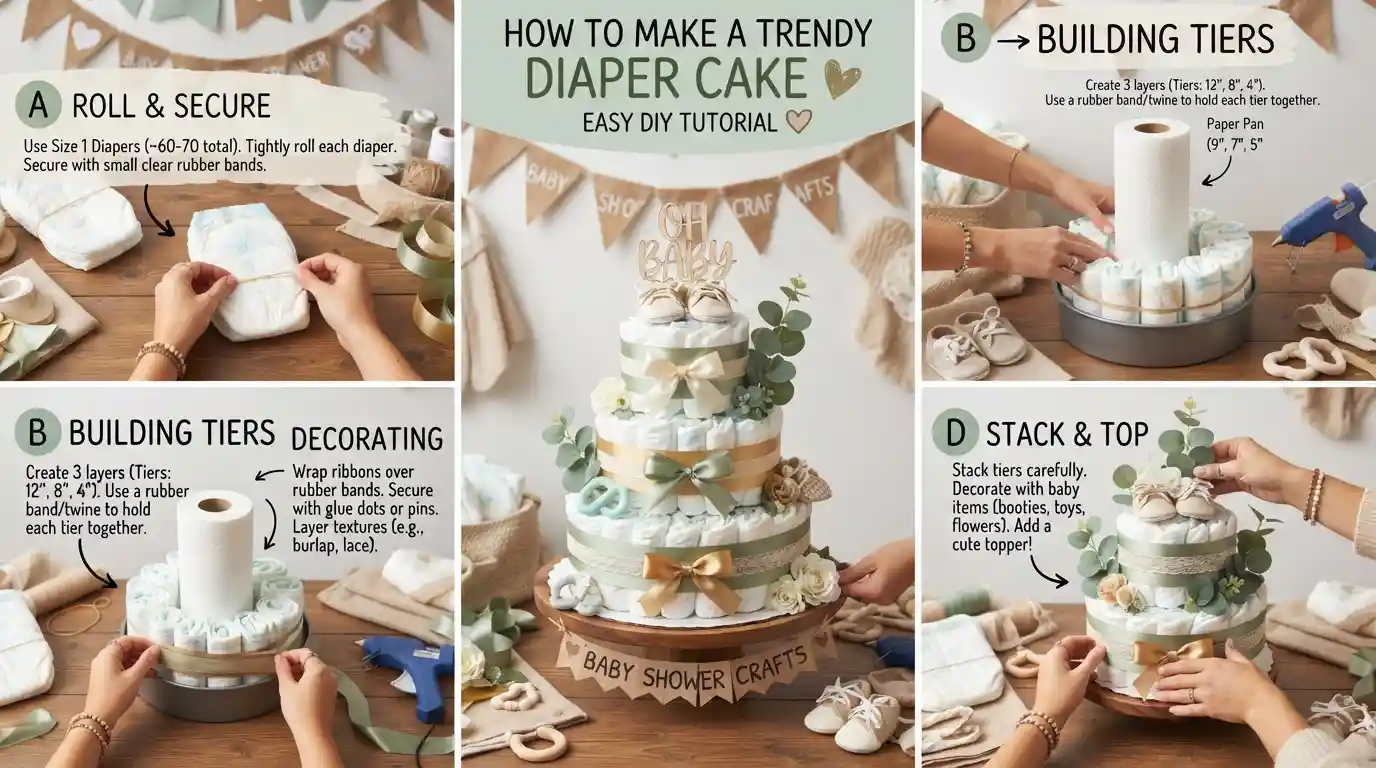
To make a diaper cake, roll clean diapers individually and secure them with small rubber bands. Arrange the rolls around a sturdy center to create a large bottom tier, then add smaller tiers on top. Secure each tier with ribbon or larger bands, cover the bands with decorative ribbon, and finish with useful baby gifts or a cute topper.
Key Takeaways
- A simple diaper cake usually takes about 50–100 diapers, depending on its size and design.
- Size 1 or Size 2 diapers can be practical choices for a baby shower gift.
- Rubber bands, ribbon, a sturdy base, and a center support make assembly easier.
- Never put glue directly on diapers if you want the parents to use them.
- Add useful items such as bibs, socks, washcloths, pacifiers, or a small stuffed animal.
What Is a Diaper Cake?
A diaper cake is a creative baby shower gift made to look like a traditional tiered cake. Instead of flour and frosting, the layers contain rolled diapers. Ribbon, baby accessories, toys, and other decorations give the finished cake its cake-like appearance.
It may look complicated, but a basic diaper cake is surprisingly easy to make. You do not need special crafting skills or expensive supplies. The key is to create firm, even circles of rolled diapers and stack them from largest to smallest.
Diaper cakes work especially well as baby shower centerpieces because they combine decoration with something the new parents can actually use. Current DIY guides commonly recommend building two or three tiers, although you can make the cake as small or large as you like.
What You Need to Make a Diaper Cake
Before you start, gather everything on a clean, flat work surface.
Basic supplies
- 50–100 diapers
- Small rubber bands
- Several larger rubber bands or elastic bands
- A round cardboard cake board or sturdy base
- One paper towel tube or another suitable center support
- Ribbon
- Scissors
- Tape or other appropriate craft supplies
- Decorative baby items
You can also add:
- Baby socks
- Bibs
- Washcloths
- Pacifiers
- Teething toys
- Small blankets
- Baby bottles
- A small stuffed animal
- A decorative sign
The exact amount of each supply depends on the size and style of your cake. For example, Babylist’s medium-sized three-tier tutorial uses about 50–100 diapers, while other designs can require more.
How Many Diapers Do You Need?
There is no single correct diaper count because the size of a diaper cake can vary greatly.
For a basic project, plan on approximately 50–100 diapers. A smaller two-tier cake may need fewer, while a large three-tier cake may need considerably more. Pampers notes that diaper cakes can range from about 25 diapers to more than 100 depending on the design.
If you are making your first cake, buying a little more than you expect to use gives you flexibility. You can make the tiers wider or keep a few extra diapers available in case some rolls do not look even.
What Size Diapers Should You Use?
Size 1 or Size 2 diapers are often practical choices for a diaper cake. Some tutorials also use newborn diapers. Babylist recommends newborn or Size 1 for its tutorial, while Pampers examples use Size 1 or 2 for several designs.
If you want the gift to remain useful longer, consider using a larger size rather than filling the entire cake with newborn diapers.
How to Make a Diaper Cake Step by Step
Step 1: Prepare Your Base
Start with a sturdy, round cardboard cake board. Place it on a clean, flat surface.
For a traditional three-tier cake, you can use a paper towel tube as a center support. Attach the tube securely to the middle of the base if your chosen method calls for it.
The center gives you something around which to arrange the diaper rolls. It also helps keep the tiers aligned.
Keep adhesive away from the diapers. If you use glue for your project, apply it only to suitable decorative materials or the base not directly to the diapers. This keeps the diapers clean and usable.
Step 2: Roll the Diapers
Take one diaper and roll it tightly from one end toward the other. Keep the roll reasonably firm, but do not crush or damage the diaper.
Secure the rolled diaper with a small rubber band.
Repeat this process with the remaining diapers.
You can roll all the diapers before assembly, or work one tier at a time. Rolling everything first makes assembly faster, while working in batches can make it easier to see how many diapers you still need.
Try to keep your rolls similar in size. Uneven rolls can make the finished cake look lopsided.
Step 3: Build the Bottom Tier
The bottom tier should be the largest part of the cake.
Place several rolled diapers around the center support. Continue adding diapers around the first group, creating a wider circle.
Keep the rolls close together. You want the tier to feel full and stable without squeezing the diapers too tightly.
Once the bottom tier reaches the size you want, wrap a large rubber band or piece of ribbon around the outside to hold everything together.
This basic technique is similar to the approach used in several current diaper cake tutorials: build a central group first, then expand it outward with additional rows of diapers.
Step 4: Add the Second and Third Tiers
Now create a smaller circle of rolled diapers above the first tier.
The second tier should be narrower than the bottom tier. Repeat the same process: arrange the rolls around the center, keep them even, and secure the completed circle.
For a three-tier cake, create one more smaller tier on top.
Think of the structure as a pyramid:
Large bottom tier → medium middle tier → small top tier
The tiers do not need to be perfect. Ribbon and decorations will hide small imperfections later.
Step 5: Secure and Check the Cake
Before decorating, gently check the cake from different angles.
Does it lean?
Are there large gaps?
Are the tiers centered?
Do the rubber bands hold everything firmly?
Fix these issues before adding decorations.
If the cake will travel to a baby shower, stability matters even more. A loosely assembled cake can shift when you pick it up or place it in a car.
For transportation, some diaper cake tutorials recommend wrapping the finished creation in cellophane or another protective covering.
Step 6: Decorate Your Diaper Cake
Now comes the fun part.
Wrap a wide ribbon around each tier to hide the rubber bands. You can add a thinner ribbon over the first one for a layered look.
Choose colors that match the baby shower theme. Soft neutrals, pastel colors, woodland themes, animals, florals, and simple greenery can all work beautifully.
Add a small stuffed animal to the top as a cake topper. You can also tuck useful baby items between the diapers.
Keep decorations practical when possible. A diaper cake can look beautiful while still giving the parents items they will appreciate.
Easy Diaper Cake Decoration Ideas
You do not need an elaborate theme to make your cake special.
Classic Baby Shower
Use pastel ribbon, a small teddy bear, baby socks, and a simple “Baby” sign.
Woodland Theme
Try neutral or earthy ribbon with an animal plush toy and small decorative leaves.
Safari Theme
Use animal-print ribbon and a small lion, elephant, or giraffe plush.
Gender-Neutral Design
Choose white, beige, green, yellow, or another neutral combination instead of traditional pink or blue.
Practical Baby Gift
Decorate the cake with bibs, washcloths, socks, pacifiers, and other small baby essentials. These items can become part of the gift rather than simply serving as decoration.
Tips for Making a Diaper Cake That Looks Good
Keep your rolls consistent. Similar-sized rolls create smoother tiers.
Do not over-tighten the diapers. They should hold their shape without being crushed.
Hide the rubber bands. The wide ribbon makes the finished cake look much cleaner.
Use a strong base. A flimsy base can make transportation difficult.
Keep diapers clean. Wash and dry your hands before handling them, and work on a clean surface.
Avoid putting glue on diapers. The goal is to give parents diapers they can still use. Several tutorials specifically recommend keeping adhesive away from the diapers.
Choose useful decorations. Baby accessories can make the cake more valuable than decorations that simply look attractive.
Think about transportation. If you need to drive to the shower, wrap the completed cake carefully so the tiers stay together.
Common Diaper Cake Mistakes to Avoid
One common mistake is buying an exact number of diapers without considering the cake’s size. Different designs use different amounts, so it is better to plan for a range.
Another mistake is making every tier the same width. A classic diaper cake looks more like a cake when each upper tier becomes smaller.
Avoid attaching decorations directly to the diapers with glue, too. Glue can damage the diaper and make it unsuitable for use.
Finally, do not spend all your effort on appearance and forget stability. A beautiful cake that falls apart during transportation will be frustrating. Build each tier firmly before moving on to the next.
Frequently Asked Questions
How many diapers do you need to make a diaper cake?
A simple diaper cake can use around 50–100 diapers, although smaller designs may need fewer and larger or specialty designs may need more. The exact number depends on the number of tiers, diaper size, and how tightly you arrange the rolls.
What size diapers are best for a diaper cake?
Size 1 or Size 2 diapers are practical choices because newborns may quickly outgrow newborn-size diapers. However, newborn or Size 1 diapers can also work well, depending on the design and your gift plans.
What can I use in the center of a diaper cake?
A paper towel tube is a simple option for supporting a traditional tiered diaper cake. Some designs can also incorporate useful baby items as part of the center structure. The support should be sturdy enough to help keep the tiers aligned.
How do you keep a diaper cake together?
Roll each diaper and secure it with a small rubber band. Arrange the rolls in tight circles and use larger rubber bands, elastic, or ribbon around each completed tier. A sturdy base and center support can also improve stability.
Can you decorate a diaper cake with baby gifts?
Yes. Small baby gifts such as socks, bibs, washcloths, pacifiers, teethers, blankets, and toys can double as decorations. This makes the diaper cake attractive while giving the parents useful items they can use after the baby arrives.
Conclusion
Making a diaper cake is easier than it first appears. Start with clean diapers, roll them evenly, and build your cake from a large bottom tier to smaller upper tiers. Once the structure feels stable, cover the rubber bands with ribbon and add useful baby accessories or a cute topper.
You do not need an elaborate design to create a memorable baby shower gift. A simple two- or three-tier cake can look beautiful while giving new parents something genuinely useful. With a little planning, you can customize the colors, decorations, diaper sizes, and theme to create a diaper cake that feels personal and thoughtful.

Margaret Mitchell is the expert behind coupleanniversary. Transforming ordinary anniversaries into unforgettable memories. With unmatched insight in love, relationships, and celebration ideas, she guides couples to make every milestone special.