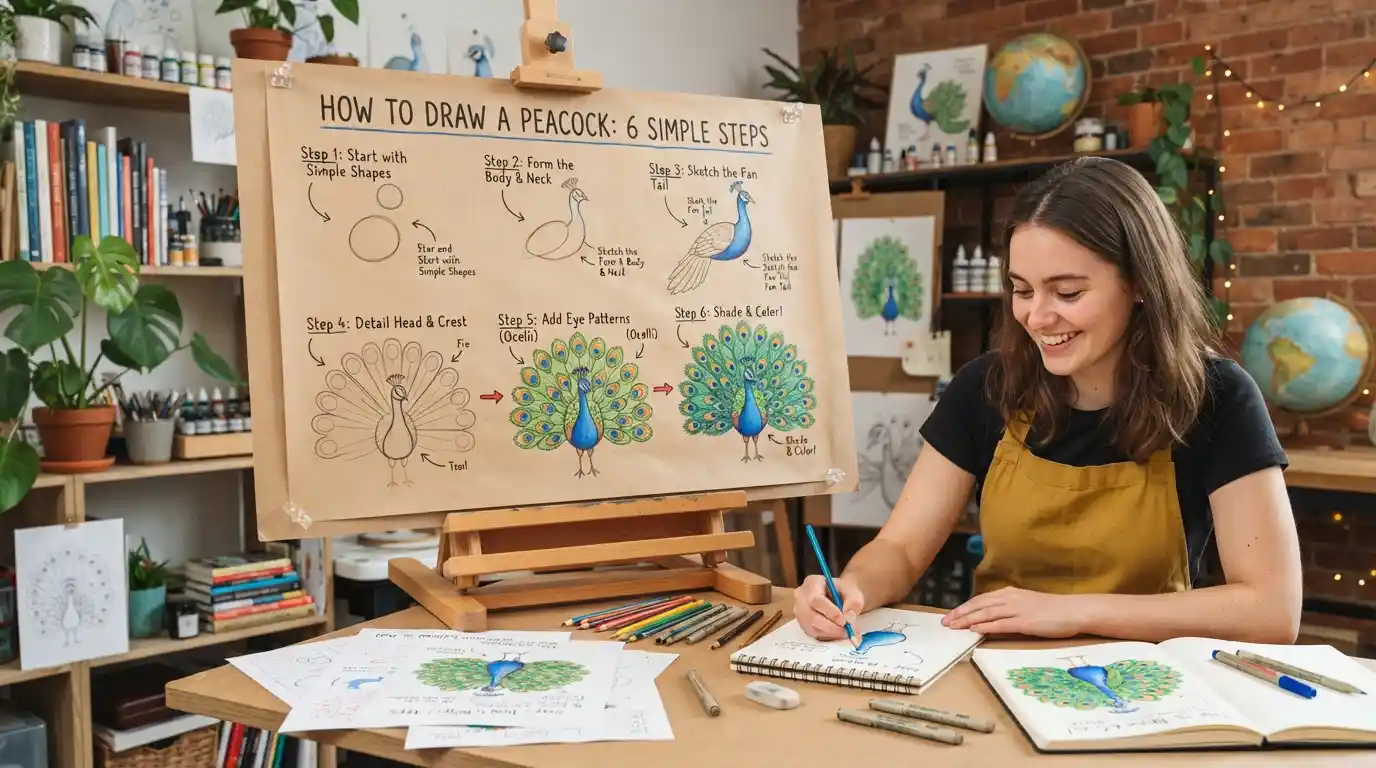
To draw a peacock, start with simple shapes for the head, neck, and body. Add the face, crest, wing, legs, and a large fan-shaped tail. Then draw repeated feather patterns, clean your outline, and add blue, green, yellow, and other colors. This simple method works well for kids and beginners.
Key Takeaways
- Start with simple shapes instead of detailed feathers.
- Keep the peacock’s body smaller than its fan-shaped tail.
- Use curved lines to make the neck and feathers look natural.
- Add repeated eye-like patterns across the tail.
- Finish with color, shading, and a few small details.
What You Need to Draw a Peacock
You do not need expensive art supplies for a simple peacock drawing. A pencil, paper, and eraser are enough to get started. You can use colored pencils, crayons, markers, or paints when you are ready to add color.
For beginners, a pencil is especially useful because you can make light construction lines first and erase them later. Many step-by-step tutorials use basic shapes such as circles and ovals to build the bird before adding details.
Materials:
- Drawing paper or a sketchbook
- Pencil
- Eraser
- Black pen or fine-tip marker
- Colored pencils, crayons, or markers
Before you begin, leave plenty of space above and around the bird. A peacock’s open tail can become much wider than its body.
How to Draw a Peacock Step by Step
Step 1: Sketch the Head and Body
Begin with a small circle for the peacock’s head. Place it slightly above the center of your page.
Next, draw a larger oval or pear-like shape below the head. This will become the body. Keep the body fairly slim because a peacock has a graceful shape rather than a round, heavy body.
Do not press your pencil too hard. These first shapes are only guides.
A simple construction method helps you focus on the overall shape before worrying about feathers. Several beginner tutorials use a circle or oval as the starting point.
Step 2: Add the Curved Neck
Connect the head to the body with two smooth curved lines.
Try to make the neck slightly curved instead of perfectly straight. This gives your peacock a more natural pose.
You can think of the neck as a long, gentle S-shaped curve. Keep the lines light for now.
If your neck looks too thick, erase part of it and redraw the curves. Small adjustments at this stage can make the finished bird look much better.
Step 3: Draw the Face and Crest
Now give your peacock a face.
Draw a small eye inside the head. Add a short pointed beak near the front of the face. You can make the beak using two simple curved or triangular lines.
Next comes one of the peacock’s most recognizable features: its crest.
Draw three or more thin curved stalks above the head. Add a tiny rounded shape to the end of each one. You can keep the crest simple rather than trying to draw every tiny feather.
Beginner drawing guides commonly simplify the crest into a few curved lines with rounded tips.
Step 4: Add the Wing and Legs
Draw a curved shape inside the body to represent the wing.
You do not need to draw every feather. A few curved lines can suggest the wing and make your bird recognizable.
Next, add two thin legs beneath the body. Keep them fairly narrow and use small curved lines for the feet.
At this point, your drawing should already look like a peacock even without its famous tail.
Step 5: Build the Fan-Shaped Tail
Now comes the most exciting part.
Behind the peacock’s body, lightly sketch a large fan shape. Start near the lower back and extend the tail outward and upward.
You can make the top edge using a series of rounded bumps, almost like the top of a cloud. Keep the fan balanced on both sides of the body.
A common beginner approach is to create a large curved or half-circle structure first and then divide it into individual feathers.
Do not worry if your tail is not perfectly symmetrical. Natural-looking artwork does not need mathematical perfection.
Step 6: Add the Peacock Feather Patterns
Peacock feathers are famous for their colorful eye-like markings.
Inside the tail, draw several oval or teardrop shapes. Place them across the fan so they follow its overall curve.
Then add smaller shapes inside each oval. You can create a simple pattern like:
Large oval → smaller oval → small circle
These repeated shapes create the familiar peacock feather effect without requiring complicated feather anatomy.
Try to keep the patterns spaced evenly. If you put too many close together, the tail can look crowded.
For a beginner drawing, simple repeated shapes work especially well. Children’s tutorials often simplify the complicated feathers into easy petal, oval, or eye-like forms.
Step 7: Clean Up Your Outline
Take a short break and look at the whole drawing.
Erase unnecessary construction circles, body guides, and tail guidelines. Then redraw any important outlines that became too light.
Make the outside silhouette slightly darker than the smaller details. This helps the peacock stand out.
You can also add a few curved lines to the wing, neck, and tail to suggest feathers. Avoid filling every empty space with marks. Leaving some open areas can make your drawing look cleaner.
Step 8: Color Your Peacock
Now bring your peacock to life.
A classic color scheme can include:
| Part | Color Ideas |
| Head and neck | Blue or blue-green |
| Wing | Blue, green, or teal |
| Tail | Green, turquoise, blue, and gold |
| Feather eyes | Blue, green, yellow, and darker shades |
| Beak | Yellow, tan, or light brown |
| Legs | Brown or gray |
| Crest | Blue, green, or mixed colors |
You do not have to follow these colors exactly. Art gives you room to experiment.
For a more realistic effect, use lighter and darker shades of the same color instead of filling every section with one flat color. Peacock feathers can appear different depending on how light reflects from them, which is one reason they can look especially colorful.
How to Make Your Peacock Drawing Look Better
Once you have the basic drawing finished, a few small changes can make a big difference.
Vary your line thickness. Use darker lines around the outside and lighter lines for small feather details.
Keep the tail balanced. The tail should spread behind the body rather than looking like a separate object attached to it.
Repeat patterns carefully. The feather eyes should generally follow the curve of the fan.
Use light shading. Add a darker shade near the bottom of the body or underneath the wing. This gives the bird more depth.
Leave some white space. You do not need to fill every part of the page.
Most importantly, do not compare your first attempt with a professional illustration. Drawing improves through repetition. Make another peacock and change its pose, tail size, or colors.
Easy Peacock Drawing Ideas for Kids and Beginners
Once you know the basic method, you can make several versions of your peacock.
1. Simple Peacock
Use a small body, basic tail, simple crest, and only a few feather patterns. This is a good choice for younger children.
2. Peacock With an Open Tail
Make the fan much larger and add more eye patterns. An open-tail design is one of the most recognizable ways to show a peacock.
3. Cartoon Peacock
Make the head slightly larger, add bigger eyes, and use exaggerated colors. You can even give your peacock a funny expression.
4. Peacock Feather Drawing
Instead of drawing the entire bird, practice one feather. Start with a long curved shape and build the eye-like pattern in the center.
5. Colorful Peacock
Try unusual combinations such as turquoise, purple, gold, pink, or violet. The goal is to practice color and pattern rather than create a scientifically accurate bird.
Common Peacock Drawing Mistakes
Making the body too large: A huge body can make the tail look small. Keep the body relatively compact.
Drawing the tail too low: Raise the fan behind the body so it frames the bird.
Adding too many feather details: Beginners often try to draw every feather. Simple shapes usually create a cleaner result.
Making both sides identical: Perfect symmetry can make the drawing feel stiff. Small differences can make it more natural.
Pressing too hard at the beginning: Light construction lines are easier to erase.
Skipping the outline cleanup: Extra guidelines can make an otherwise good drawing look unfinished.
Frequently Asked Questions
How do you draw a peacock step by step?
Start with the head and body, then connect them with a curved neck. Add the eye, beak, crest, wing, and legs. Next, draw a large fan-shaped tail behind the body. Add eye-like feather patterns, erase your guide lines, and finish with color.
How do you draw an easy peacock for kids?
Use simple circles, ovals, and curved lines. Draw a small head, a pear-shaped body, thin legs, and a large rounded tail. Instead of drawing detailed feathers, use simple oval patterns across the tail. This keeps the activity manageable for young artists.
What colors should you use for a peacock drawing?
Blue, green, turquoise, yellow, and darker blue are common choices. You can also use purple, gold, or other colors for a creative version. Use several shades instead of one color if you want the feathers to have more depth.
How do you draw a peacock with an open tail?
First draw the bird’s body and then sketch a large fan or half-circle behind it. Divide the fan into sections with curved lines and place oval eye patterns inside the feathers. This approach is commonly used in beginner open-tail tutorials.
Conclusion
Learning how to draw a peacock becomes much easier when you break the bird into simple shapes. Start with the head, body, and curved neck. Then add the crest, wing, legs, and large fan-shaped tail. Once the main outline looks right, add the repeating feather patterns and your favorite colors.
Do not worry about making your first peacock perfect. Focus on getting the basic shapes and proportions right. With a little practice, you can experiment with open tails, different poses, colorful feathers, and more detailed designs. Grab a pencil, start with light lines, and enjoy creating your own peacock.