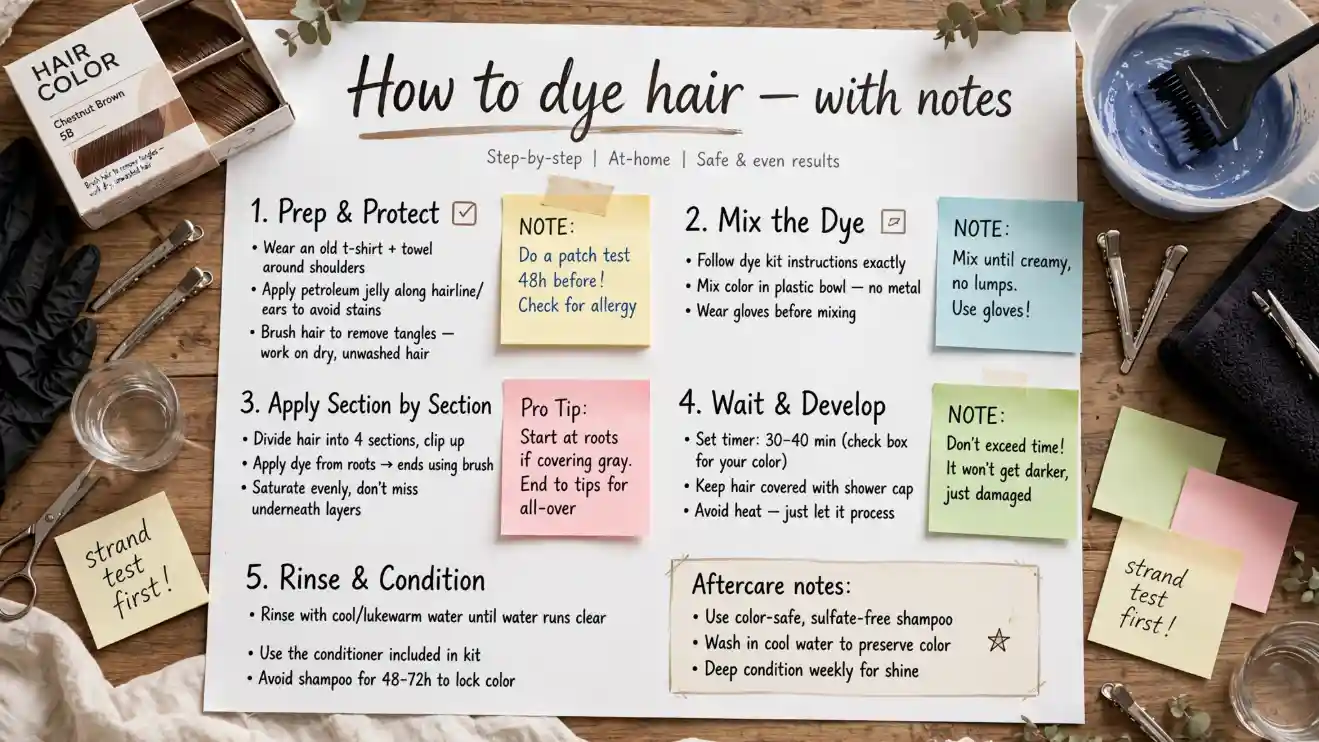
To dye your hair at home, choose a shade that suits your current color, perform the required patch and strand tests, prepare your supplies, section your hair, apply the dye according to the package directions, wait the recommended time, then rinse and condition. Always follow the specific instructions included with your hair-color product.
Key Takeaways
- Choose a shade close to your current color if you want a simpler at-home result.
- Perform a patch test before every dyeing session and a strand test before coloring your whole head.
- Follow the product’s mixing instructions and processing time exactly.
- Do not use hair dye on your eyebrows or eyelashes at home.
- Use gentle, color-friendly products afterward to help maintain your new shade.
Choose the Right Hair Dye
Before you learn how to dye hair, you need to choose the right product. Your current hair color matters just as much as the shade shown on the box.
For a first-time color change, staying relatively close to your natural shade can make the process easier. The American Academy of Dermatology recommends choosing a dye within about three shades of your natural color when possible. Going significantly lighter can require stronger lightning products and may cause more damage.
You should also think about how long you want the color to last.
Permanent vs. Semi-Permanent Color
Permanent hair color generally provides longer-lasting results and can be useful for major color changes or gray coverage.
Semi-permanent color usually offers a less permanent change and can be useful when you want to experiment with a shade without committing to it for as long.
Read the package carefully because application methods, processing times, and results vary by product.
Prepare Before You Dye Your Hair
Good preparation can prevent uneven color, stained clothes, and unnecessary hair problems.
Before starting, gather:
- Your hair-color kit
- Disposable gloves
- Old towel or clothing
- Hair clips
- Comb or brush
- Timer
- Petroleum jelly for protecting the skin around the hairline, if recommended
- A mirror that lets you see the back of your head
Keep your workspace easy to clean. Hair dye can stain towels, clothing, counters, and other surfaces.
Do a Patch Test
A patch test is one of the most important steps.
The FDA recommends testing hair dye on a small area of skin before use and leaving it for 48 hours. If you develop a rash, do not use the product. The FDA also notes that people can become sensitive to hair-dye ingredients even if they previously used hair color without a problem.
Follow the exact patch-test instructions included with your product.
If you experience symptoms such as significant swelling, burning, or difficulty breathing, seek appropriate medical attention.
Do a Strand Test
A strand test answers a different question: What will this color actually look like on your hair?
Take a small, hidden strand, apply the dye according to the product directions, process it for the recommended time, then rinse and dry it.
This can help you see if the final shade looks too dark, too warm, too cool, or simply different from what you expected. Clairol also recommends a strand test before committing to your full head.
How to Dye Hair at Home Step by Step
Once your tests are complete and you are ready to color your hair, follow these steps.
1. Protect Your Clothes and Skin
Put on the gloves included with your kit and wear an old shirt or towel around your shoulders.
You can apply a thin layer of petroleum jelly around the hairline to make accidental skin stains easier to clean, provided your product instructions do not advise otherwise.
Keep the dye away from your eyes.
The FDA specifically warns against using hair dye on eyebrows or eyelashes at home because it can cause serious eye injuries, including blindness.
2. Section Your Hair
Divide your hair into manageable sections using plastic clips.
Four sections often make application easier: two in the front and two in the back.
Work with small sections rather than trying to cover your entire head at once. This helps you distribute the color more evenly.
If your hair is long or thick, you may need more product. Running out halfway through the application can leave you with uneven color.
3. Mix the Dye
Follow the instructions inside your specific hair-color kit.
Some products combine a colorant and developer in a bottle. Others require you to mix separate components.
Do not guess the ratio.
Also, don’t mix different hair-color products together unless the manufacturer specifically tells you to do so. The FDA advises consumers not to mix different hair-dye products.
4. Apply the Color
Start applying the dye according to your product’s instructions.
For many at-home color products, application begins around the roots, followed by the rest of the hair. However, the correct method can vary depending on if you are doing an all-over color, root touch-up, lightening service, or another type of application.
Work methodically from one section to the next.
Make sure the hair is thoroughly coated without repeatedly combing or manipulating it unnecessarily.
Garnier’s current U.S. instructions, for example, direct users to apply color section by section, beginning at the roots and distributing it through the lengths and ends.
5. Follow the Processing Time
Set a timer.
Do not leave the dye on longer simply because you want a stronger or darker result. More time does not automatically produce a better color and may increase irritation or damage.
The FDA advises following the package directions and not leaving hair dye on longer than instructed.
Processing times vary between products, so use the instructions that came with your particular dye.
6. Rinse and Condition
When the recommended time is complete, rinse your hair thoroughly.
Use the water temperature and rinsing method specified by the product instructions. Continue rinsing until the water is sufficiently clear.
Then apply the conditioner provided with the kit or another appropriate product recommended for color-treated hair.
For example, Garnier’s U.S. instructions recommend rinsing until the water runs clear and then using the included after-color conditioner.
Should You Dye Your Roots or Full Head?
That depends on what you are trying to accomplish.
If you are coloring your hair for the first time, you may need an all-over application depending on your chosen product and desired result.
If you are simply covering new growth, a root touch-up may make more sense than repeatedly coloring your entire head.
Applying permanent color over already-colored lengths again and again can lead to unnecessary processing. For routine touch-ups, follow the product’s instructions for roots rather than automatically recoloring every strand.
How to Dye Hair Lighter
This is where many beginners run into trouble.
Dyeing your hair a darker or similar shade is generally more straightforward than making naturally dark hair dramatically lighter. The American Academy of Dermatology notes that lightening hair by more than about three shades generally requires higher levels of peroxide and can cause more damage.
If you want a major transformation from dark brown or black to very light blonde, professional help may be the safer and more predictable option.
Remember that hair dye and bleach are not the same thing. A regular color product may not produce the dramatic lightening you see in a salon transformation.
Common Hair-Dye Mistakes to Avoid
A few simple mistakes can make home coloring much harder.
Skipping the patch test: A previous successful dye job does not guarantee that you will never develop sensitivity.
Skipping the strand test: The color on the box is a guide, not a guarantee of your exact result.
Leaving dye on too long: Always use the manufacturer’s recommended processing time.
Using too little product: Long or thick hair may require additional product for complete coverage.
Applying unevenly: Large sections can make it easy to miss areas.
Using dye on your eyebrows or eyelashes: Never use regular scalp hair dye in these areas at home.
Dyeing an irritated scalp: The FDA advises against dyeing hair when the scalp is irritated, sunburned, or damaged.
How to Care for Dyed Hair
Your work does not end when you rinse the dye.
Use products designed for color-treated hair and avoid unnecessarily harsh washing routines. Clairol recommends reducing washing after coloring and choosing color-protecting shampoo.
You can also:
- Use conditioner regularly.
- Avoid very hot water if it makes your color fade faster.
- Limit excessive heat styling.
- Protect your hair from strong sun exposure.
- Follow the maintenance instructions for your particular color.
- Touch up only the areas that need color when appropriate.
Colored hair can become dry or brittle, so gentle care matters. The American Academy of Dermatology recommends protecting dyed hair from sun exposure because sunlight can contribute to dryness, roughness, fading, and brittleness.
When Should You See a Professional?
Home hair color works well for many straightforward changes, but some projects are better left to a professional.
Consider visiting a colorist if you want to:
- Make a dramatic color change.
- Go from very dark hair to very light blonde.
- Correct uneven or damaged color.
- Remove several layers of previous dye.
- Create complex highlights or balayage.
- Work with heavily processed or fragile hair.
A professional can assess your existing color and condition before choosing a technique.
Frequently Asked Questions
Should I wash my hair before dyeing it?
Follow your product’s instructions because preparation differs between formulas. Some products are designed for dry, unwashed hair, while others may have different requirements. Avoid assuming that one rule works for every hair dye.
How long should I leave hair dye on?
Leave it on for exactly the time recommended by your product. Processing time varies by formula and shade. Do not extend the time to try to make the color stronger. The FDA specifically advises against leaving dye on longer than the directions state.
Can I dye my hair lighter without bleach?
Sometimes you can achieve modest lightening with a product designed for that purpose, but a regular dye is not a universal solution for dramatically lightening dark hair. Major color changes may require professional lighting.
Should I shampoo after dyeing my hair?
Follow the instructions supplied with your product. Some manufacturers recommend rinsing and conditioning without immediately using regular shampoo. For example, Clairol advises avoiding immediate shampooing after coloring and recommends color-protecting products afterward.
How often can I dye my hair?
There is no single schedule that works for everyone. It depends on the type of dye, your hair’s condition, and if you are coloring new growth or your entire head. Repeated chemical processing can contribute to dryness and brittleness, so avoid unnecessary full-head applications.
Conclusion
Learning how to dye hair at home does not have to be complicated. Start by choosing an appropriate shade, read the instructions, perform the required patch and strand tests, prepare your workspace, and apply the color carefully in sections. Most importantly, follow the product’s recommended processing time rather than guessing.
For simple color changes, at-home dye can be a convenient option. However, dramatic lightening, major color corrections, or heavily processed hair may require professional help. With careful preparation and good aftercare, you can make the coloring process easier while protecting the health and appearance of your hair.

Dan Brown is a passionate relationship writer and anniversary message expert at coupleanniversary. With a deep understanding of love, marriage, and meaningful celebrations, he specializes in creating heartfelt anniversary wishes, romantic messages, and thoughtful words that help couples express their emotions perfectly.