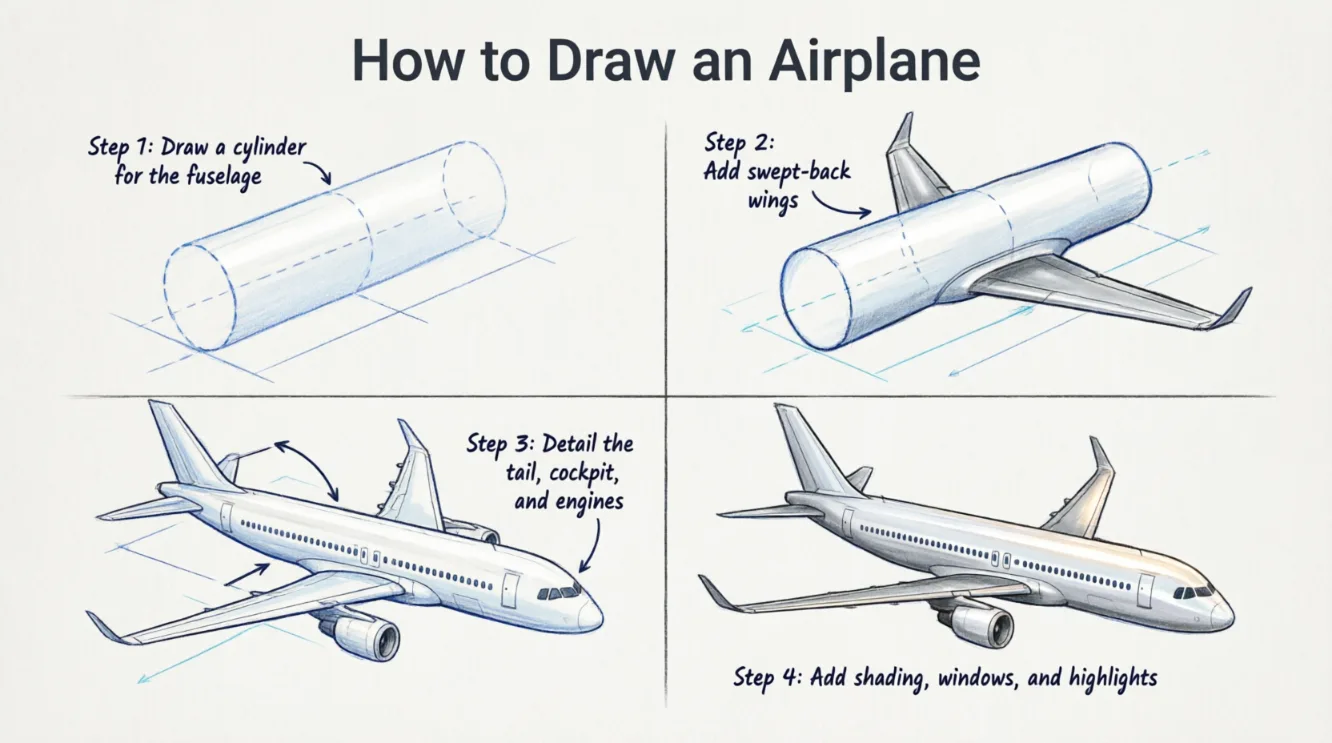
To draw an airplane, start with a long oval or rounded shape for the body. Add the nose, tail, main wings, tail fin, cockpit, windows, and engines. Use light pencil lines first, then erase extra marks, trace the final outline, and add color or shading.
Key Takeaways
- Start with simple shapes instead of trying to draw every detail at once.
- Keep the airplane body long and balanced.
- Add the wings before working on small details.
- Use light pencil lines so you can easily correct mistakes.
- Finish with windows, engines, colors, clouds, or other creative details.
What You Need to Draw an Airplane
You do not need expensive art supplies to learn how to draw an airplane. A few basic materials are enough:
- Paper or a sketchbook
- Pencil
- Eraser
- Black pen or fine-tip marker
- Colored pencils, crayons, or markers
A ruler can also help if you want very straight lines, but it is optional.
Many beginner airplane tutorials recommend starting with simple shapes and building the aircraft one part at a time. This approach makes the drawing easier to manage, especially for children and new artists.
Before you begin, place your paper horizontally. This gives your airplane enough room to stretch across the page.
How to Draw an Airplane Step by Step
The following method creates a simple passenger airplane. You can make it realistic, cartoon-like, or colorful as you go.
Step 1: Draw the Main Body
Start with the largest part of the airplane: the fuselage, or main body.
Lightly draw a long, narrow oval across the middle of your paper. You do not need to make it perfect. Keep the front slightly wider and rounder than the back.
Think of the body as a long capsule.
The nose will sit at one end, while the tail will sit at the other. Leave enough space around the body for the wings and engines.
Beginner tip: Keep your pencil pressure light. These first lines are guides, so you can erase them later.
Step 2: Shape the Nose and Tail
Now give your airplane a recognizable front and back.
At the front, round the nose so it looks smooth rather than completely pointed. At the back, narrow the body slightly.
Then add the vertical tail fin. Draw a triangular or curved fin rising from the rear of the airplane.
The tail helps establish the airplane’s direction and makes the basic outline look much more like an aircraft.
Step 3: Add the Main Wings
The wings are one of the most important parts of your airplane drawing.
Draw one large wing from the middle of the body. Let it extend outward and slightly backward. Then add the opposite wing.
If you are drawing the airplane from the side, you may see one wing more clearly than the other. If you are using a front or three-quarter view, pay close attention to symmetry and perspective.
A common beginner mistake is making one wing much larger than the other without intending to. Light guide lines can help you keep the wings balanced.
Step-by-step airplane tutorials commonly build the drawing around the fuselage and then add the major wings before smaller details.
Step 4: Draw the Tail Fin and Small Wings
Your airplane needs more than its two large wings.
Add a smaller horizontal stabilizer near the tail. It should look like a small pair of wings attached close to the back of the airplane.
Check the tail fin again. Make sure it connects naturally with the body.
At this point, your drawing should already be recognizable as an airplane even without windows or engines.
Step 5: Add the Cockpit and Windows
Now bring your airplane to life with windows.
Start with the cockpit window near the front. You can draw one curved window or divide it into several sections.
Next, create a row of small passenger windows along the side of the body.
Try to keep the windows similar in size and spacing. You do not need to count every window on a real aircraft. A simple row works well for an easy drawing.
You can also add a small door near the front or middle of the airplane.
Step 6: Draw the Engines
Most modern passenger airplanes have engines beneath their wings.
Draw one or two small cylindrical engine shapes under the main wing. From a side view, the engine may look like a short tube with a rounded opening.
Keep the engines smaller than the main body.
For a cartoon airplane, you can simplify them into small rounded shapes. For a more realistic drawing, add a dark circle inside each engine to suggest depth.
Step 7: Clean Up the Outline
Now look at your whole drawing.
Erase construction lines that you no longer need. Fix any areas where the wings, tail, or body look uneven.
Then trace the important lines with a darker pencil, fine-tip pen, or marker.
Do not rush this stage. A clean outline can make a simple airplane drawing look much more polished.
If you want a realistic result, pay attention to proportions. Tutorials aimed at beginners also emphasize keeping the airplane’s body and wings properly balanced.
Step 8: Add Color and Details
Now it is time to make your airplane unique.
You could use:
- White and blue for a classic passenger plane
- Red and white for a bold cartoon style
- Gray and black for a more realistic aircraft
- Bright colors for a children’s drawing
Add a blue or gray color to the windows. You can also shade the underside of the airplane slightly darker than the top.
Finally, draw a few clouds around the plane.
You can even add sunlight, birds, mountains, a city below, or curved motion lines behind the airplane.
How to Make Your Airplane Drawing Look Better
Once you know how to draw an airplane using basic shapes, a few small improvements can make a big difference.
Keep the body balanced.
The fuselage should not be extremely short compared with the wings. A long body usually gives a passenger plane a more recognizable shape.
Use light construction lines.
Do not press hard while creating the first sketch. Light lines are much easier to erase.
Think about perspective.
If the airplane is flying toward you, the front may look larger. If it is moving away, the rear may become more noticeable.
Keep repeated details consistent.
Passenger windows should generally follow the curve of the airplane rather than floating randomly across the body.
Add shadows carefully.
A small amount of shading under the wings and body can give your drawing more depth without making it complicated.
Common Airplane Drawing Mistakes
Making the body too short
A very short body can make the airplane look more like a toy or strange flying object. Stretch the fuselage horizontally before adding details.
Making the wings uneven
Uneven wings can make the airplane look tilted when you did not intend it to be. Use a light centerline to help position them.
Adding details too early
Windows, doors, and engines are fun, but they should come after the main structure. Build the large shapes first.
Pressing too hard with the pencil
Heavy construction lines can be difficult to erase. Start softly and darken the final outline later.
Forgetting the tail
The tail fin and stabilizers are small, but they help make the aircraft recognizable. Add them before finishing your sketch.
Easy Airplane Drawing Ideas to Try
Once you finish your first airplane, you can experiment with different designs.
Draw a Cartoon Airplane
Make the windows larger, give the plane a smiling face, and use bright colors. This style works especially well for younger children.
Draw a Passenger Jet
Use a long fuselage, two large wings, multiple passenger windows, and engines underneath the wings.
Draw an Airplane Flying Through Clouds
Place your finished airplane high on the page. Add fluffy clouds below and around it. A few curved motion lines can make the aircraft appear to be moving.
Draw a Plane From the Front
This version is more challenging because you need to think about symmetry. Make the nose central and position the wings on both sides.
Draw a Plane From a Three-Quarter View
A three-quarter view gives the drawing more depth. One wing can appear larger because it is closer to the viewer.
Draw a Military Aircraft
Change the shape of the wings and body to create a faster-looking aircraft. Keep the design simple if you are still learning.
Frequently Asked Questions
How do you draw an airplane step by step?
Start with the long body, then add the nose, tail fin, main wings, smaller tail wings, cockpit, passenger windows, and engines. Finish by cleaning your outline and adding color. Breaking the airplane into these large sections makes the process easier for beginners.
How do you draw a simple plane?
Use basic shapes. Draw a long oval for the body, triangles or tapered shapes for the wings and tail, small circles or ovals for windows, and rounded shapes for the engines. You can create a recognizable airplane without a complicated perspective.
How do you draw an airplane for kids?
Keep the drawing simple and use large, easy-to-follow shapes. Children can start with the airplane body, add two wings, a tail, windows, and an engine, then color the finished picture. Beginner tutorials commonly use this shape-by-shape approach for young artists.
What shapes can you use to draw an airplane?
You can use ovals, long rounded rectangles, triangles, curved lines, circles, and tapered shapes. Combining simple geometric forms is an easy way to build the airplane’s body, wings, tail, windows, and engines.
How do you draw airplane wings?
Start the main wing near the middle of the fuselage and extend it outward with a slight backward angle. Then add the opposite wing while keeping the size and angle consistent with your chosen perspective.
How can I make my airplane drawing look realistic?
Focus on proportions, perspective, wing placement, and shading. Keep the construction lines light and study how the body, wings, engines, and tail connect. A three-quarter view can also make a simple airplane appear more dimensional.
Conclusion
Learning how to draw an airplane becomes much easier when you stop thinking about the aircraft as one complicated object. Start with the main body, then build it piece by piece.
Draw the fuselage first. Add the nose, wings, tail, cockpit, windows, and engines. Once the basic outline looks right, clean your lines and add color.
Remember that your first drawing does not need to be perfect. Practice different airplane shapes, views, and styles. With a little patience, you can move from a simple cartoon plane to a detailed passenger jet or a dramatic airplane flying through the clouds.
And one quick language tip: in standard American English, the natural phrase is “how to draw an airplane,” because airplane begins with a vowel sound. However, the original search phrase “how to draw an airplane” can still be addressed naturally in the article.

Dan Brown is a passionate relationship writer and anniversary message expert at coupleanniversary. With a deep understanding of love, marriage, and meaningful celebrations, he specializes in creating heartfelt anniversary wishes, romantic messages, and thoughtful words that help couples express their emotions perfectly.